How to Paint an Unfinished Basement Ceiling | 7 DIY Steps to Follow
TheToolGeeks.com is a participant in the Amazon Services LLC Associates Program and other affiliate advertising programs. We may earn from qualifying purchases. (Learn More).
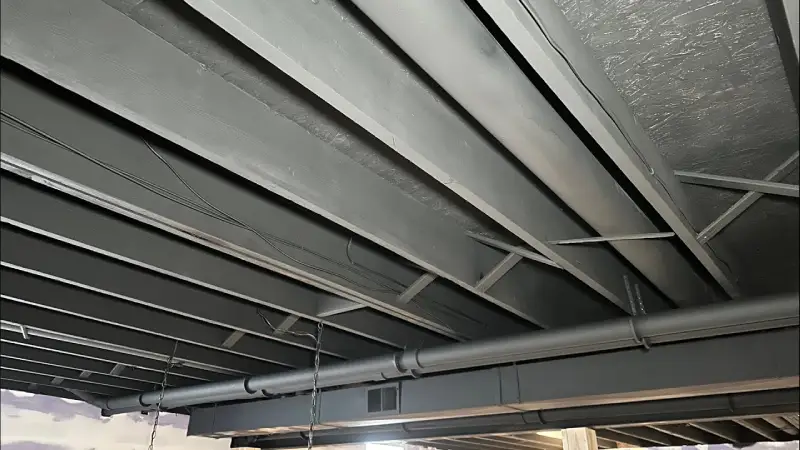
Unfinished basement ceilings typically contain exposed floor joists, floorboards, ductwork, and possibly even plumbing. They can make the space seem cold and uninviting if not attended to.
However, painting the ceiling can make the room feel brighter, taller, and more finished without adding a ceiling cover. But how to paint an unfinished basement ceiling to make the space more elegant and brighter?
For instance, if you want to paint the surface, prepare the workspace by decluttering and cleaning it for proper paint adhering. Protect the floor surfaces with drop cloths, apply thin, consistent coats, and pay attention to detail. Then, choose a paint color based on the wall color and your desires.
Let’s unravel the mysteries of painting an unfinished home basement ceiling and discover the key steps to turn it into a stylish asset for your home.
How to Paint an Unfinished Basement Ceiling | 7 DIY Steps

Get ready to transform your basement with a fresh coat of paint. Start by prepping the area and cleaning it thoroughly, and then follow the steps:
- Preparing the workspace
- Cleaning and priming the basement ceiling
- Taping and masking the basement ceiling
- Choosing the right paint and equipment
- Painting the unfinished basement ceiling
- Apply finishing touches
- Enjoy your transformed space
Step 1: Preparing the Workspace
To prepare your workspace for painting an unfinished basement ceiling, begin by decluttering the area and removing all obstacles to facilitate a smooth painting process. Clear out any items that obstruct your movement or access to the ceiling.
Protect your walls and floors with drop cloths or plastic sheeting to prevent paint splatter. Adequate ventilation is essential, so open windows or use fans to keep the area well-ventilated.
Remember to wear protective gear, such as masks, gloves, and eyewear, to shield yourself from dust and fumes. These steps will create a safe and organized environment for you to start painting your basement ceiling effectively.
Step 2: Cleaning and Priming the Basement Ceiling
Begin transforming your unfinished basement ceiling by thoroughly cleaning the ceiling joists to remove dust and debris, ensuring a pristine surface for painting.
Use a broom, leaf blower, or shop vacuum to rid the joists of any lingering particles that could affect paint adhesion. Once clean, consider applying a latex primer to enhance coverage and adhesion for a flawless finish.
Priming is crucial for creating a uniform base to make the paint job look more professional and last longer.
Step 3: Taping and Masking the Basement Ceiling
Now that you have meticulously cleaned and primed your basement ceiling, it’s time to move on to the next step: precision tape and mask off the ceiling before starting the painting process.
Begin by using painter’s tape to carefully outline the bottom border of the ceiling, ensuring your lines are straight and edges are crisp. For larger spaces, a laser level can be handy for accuracy.
Remember to cover HVAC vents and areas you wish to shield from paint overspray. Use products like Frog Tape and plastic sheeting to secure these areas effectively.
Taking the time to tape and mask off your ceiling will result in a cleaner and more professional finish once the painting is complete.
Step 4: Choosing the Right Paint and Equipment
Invest in a dependable paint sprayer for optimal coverage and durability. Consider enhancing the professional look of your unfinished basement ceiling by carefully selecting the ideal matte black drywall paint.
Choose matte black drywall paint specially formulated for commercial spaces. It offers excellent coverage and lasting durability. A reliable paint sprayer will streamline the painting process and ensure even application, especially in areas with intricate ceiling layouts containing pipes and ducts.
This combination of high-quality paint and equipment will make your painting project more efficient, resulting in a sleek and polished finish for your basement ceiling. For best results, follow the manufacturer’s paint and sprayer guidelines.
Step 5: Painting the Unfinished Basement Ceiling
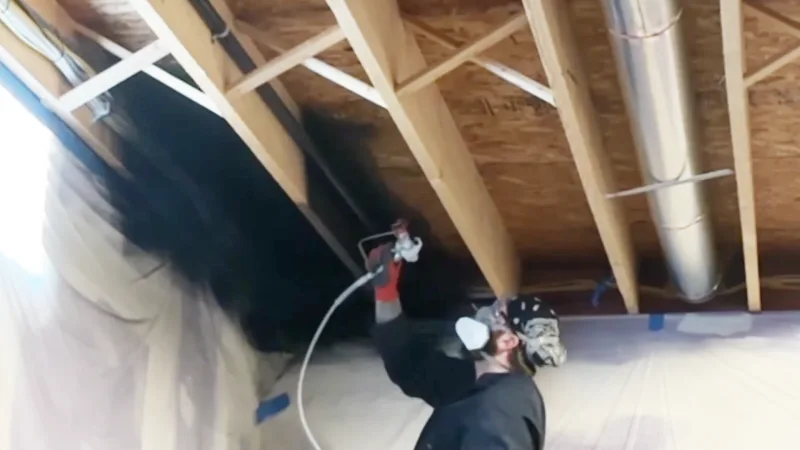
Enhance the unfinished basement ceiling by loading your chosen paint into the sprayer and adjusting the settings per the manufacturer’s instructions.
Begin painting by spraying from various angles, ensuring complete coverage while avoiding overspray. Take time to work systematically, starting from one corner and moving methodically across the ceiling. Use a brush and roller for touch-ups for areas that are hard to reach with the sprayer.
Ensure each section receives an even coat of paint for a polished look. Continue until the entire ceiling is covered, ensuring consistency in color and finish. This is crucial in transforming your basement into a more inviting and cohesive space.
Step 6: Apply Finishing Touches
For a final touch of perfection, carefully examine your freshly painted unfinished basement ceiling to ensure a flawless finish. Once the paint has dried per the manufacturer’s instructions, gently remove the tape and plastic coverings to reveal the transformed space.
Inspect the ceiling meticulously for imperfections or areas needing additional touch-ups. Promptly address any issues you notice to maintain the impeccable look you’ve worked hard to achieve.
By paying attention to these finishing touches, you can elevate the overall appearance of your basement and create a polished and cohesive atmosphere. Step back and admire your handiwork, appreciating the effort you’ve put into revitalizing your basement ceiling.
Step 7: Enjoy Your Transformed Space
After inspecting your freshly painted basement ceiling for imperfections or areas requiring touch-ups, let’s step back and appreciate the transformation you have achieved.
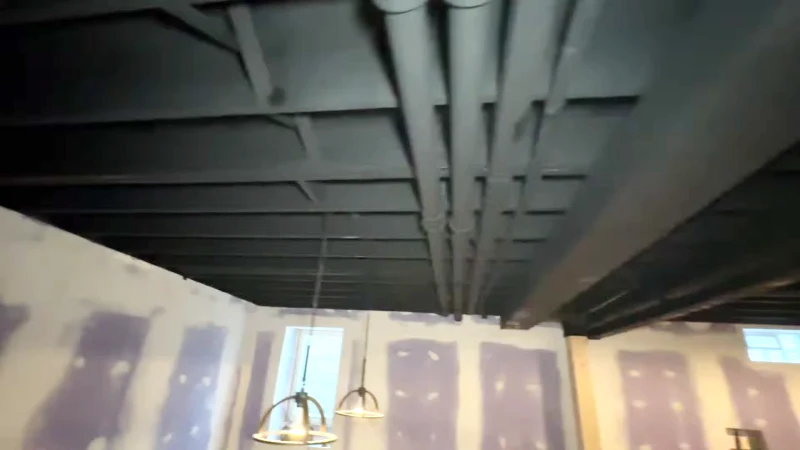
The fresh coat of paint enhances the aesthetics and brightens the entire area, making it more welcoming for you and your family. To further elevate the ambiance, consider adding black can lights that complement the industrial-style look of the ceiling.
With the project complete, take a moment to revel in your basement’s newfound beauty. The revamped space is now ready for you to create new memories, host gatherings, or simply relax in a stylish and cozy environment.
What to Consider When Painting an Unfinished Basement Ceiling?

Before painting your unfinished basement ceiling, carefully consider the following things:
1. Product Selection
Select products specifically formulated for ceiling surfaces when choosing the perfect paint and tools for painting your unfinished basement ceiling. Look for paints designed for ceilings, like matte black drywall paint or latex paint with a primer. These options provide good coverage and durability.
Investing in the right tools is also crucial. Consider using a paint sprayer such as the Wagner Flexio 5000 or HomeRight C800971 for a more efficient and effective painting process. These tools can help you achieve a smooth and professional finish on your basement ceiling.
2. Safety Precautions
Ensure your safety during the painting process by wearing appropriate personal protective gear and maintaining proper ventilation in the basement to minimize exposure to paint fumes and particles.
Prioritize safety by donning full-body suits, protective eyewear, and N95 masks to shield yourself from harmful substances. Adequate ventilation is crucial to dissipate fumes and ensure a healthy painting environment. Consider using fans or opening windows to improve air circulation.
3. Surface Protection
Protect your surfaces with effective surface protection measures to safeguard your basement environment and belongings during the painting process.
Before you start painting, shielding surrounding areas from paint splatter and overspray is crucial. Use drop cloths and plastic sheeting to cover walls, floors, and any furnishings or belongings in the basement. This will prevent potential damage and simplify the cleanup process once the painting is finished.
Ensuring thorough coverage with protective materials will help maintain the integrity of your basement space and keep your possessions safe from accidental spills or drips. These precautions will allow you to focus on painting with peace of mind and achieve a professional-looking result.
4. Application Technique
Apply the paint with precision and care to ensure a flawless finish when painting an incomplete basement ceiling. Utilizing the best paint sprayer can be advantageous for covering larger areas efficiently while ensuring even distribution and reducing the likelihood of brush marks or streaks.
Adjust the sprayer settings according to the manufacturer’s recommendations and the paint’s viscosity. Aim for thin, consistent coats to achieve the best results when applying the paint.
This method helps achieve a professional-looking finish and minimizes the chances of drips or uneven coverage. Take your time and pay attention to detail to transform your unfinished basement ceiling into a polished space.
5. Lighting Considerations
Mastering the art of lighting in your basement is key to enhancing the ambiance and aesthetic appeal of your freshly painted unfinished ceiling.
When considering lighting options, opt for overhead fixtures like black can lights to complement the space’s industrial vibe and showcase your newly painted ceiling. These lights can provide a modern touch while illuminating the area effectively.
To further enhance the ambiance, consider installing dimmer switches. Dimmers offer versatility, allowing you to adjust the lighting levels for different activities. If you strategically plan your lighting scheme, you can turn your unfinished basement into a stylish and inviting area that shows off your painted ceiling.
Why should you paint an unfinished basement ceiling?
Painting an unfinished basement ceiling offers several compelling reasons, making it a worthwhile endeavor for homeowners looking to improve the appearance and functionality of their basement space. Here are several key reasons why painting an unfinished basement ceiling can be beneficial:
1. Enhanced Aesthetic Appeal
An unfinished basement with exposed ceiling joists, pipes, and ductwork can appear unappealing and unfinished. Painting the ceiling can dramatically improve the overall look of the space, making it feel more polished and cohesive.
Choosing the right paint color and finish can also help create a specific ambiance or style, such as a modern or industrial look.
2. Increased Brightness and Openness
Painting the ceiling white or another light color can help reflect light and make the basement feel brighter and more open. This is especially beneficial in basements with limited natural light, helping to combat the typically dark and dreary atmosphere often associated with unfinished basements.
3. Height Perception
Painting the ceiling can create the illusion of added height in the basement. Light-colored ceilings, in particular, can visually lift the ceiling, making the space feel larger and more spacious than it is. This can be especially advantageous in low ceilings or limited vertical space basements.
4. Improved Cleanliness and Maintenance
Painting the ceiling can help seal and protect the surface, making it easier to clean and maintain. A painted ceiling is less prone to collecting dust, dirt, and cobwebs than an exposed ceiling with rough surfaces.
Additionally, any imperfections or stains on the ceiling can be concealed with paint, resulting in a cleaner and more polished appearance.
5. Better Insulation and Energy Efficiency
Depending on the type of paint used, painting the ceiling can provide additional insulation and improve energy efficiency in the basement. Reflective or insulating paints can help reduce heat loss through the ceiling and potentially lower heating and cooling costs, contributing to a more comfortable living environment.
6. Versatility in Design
Painting the ceiling opens up a world of design possibilities, allowing homeowners to personalize their basement space to suit their tastes and preferences.
Painting the ceiling allows for creative expression and customization, whether you prefer a bold statement color, a subtle, neutral shade, or a decorative finish like faux finishes or stenciling.
7. Increased Property Value
A finished basement, including a painted ceiling, can add significant value to your home. A well-maintained and aesthetically pleasing basement space can appeal to potential buyers and enhance the overall marketability of your property.
Additionally, a painted ceiling can be viewed as a sign of attention to detail and quality craftsmanship, further increasing its appeal.
Is it OK to paint the exposed basement ceiling?

While some may hesitate to paint an exposed basement ceiling due to concerns about its suitability, it’s perfectly okay to do so. Painting the ceiling can greatly improve the overall look and feel of the basement.
With its many pipes, wires, and nooks and crannies, spray paint is recommended to ensure a smooth finish. This method allows you to easily cover all the elements in the ceiling without missing any spots.
What are the benefits of painting an unfinished basement ceiling?
Enhance your basement’s overall aesthetics and functionality by painting the unfinished ceiling to create a brighter, more polished appearance.
Painting the unfinished basement ceiling can significantly improve the space’s appearance, making it feel more inviting and visually taller. Adding a fresh coat of paint can also brighten up the room and give it a more finished look, transforming it into a cozy area for various activities.
Moreover, painting the ceiling can provide easier access to pipes for future maintenance and repairs. The fresh coat of paint can act as a protective layer, helping to prevent moisture damage and corrosion on the exposed pipes. This can save you time and money in the long run by reducing the risk of potential issues.
What paint color should I use for the exposed basement ceiling?
When choosing a paint color for your exposed basement ceiling, the hue you select can significantly impact the overall ambiance of the space. White paint can make the basement appear brighter but may require more coats and a special primer to prevent knots from turning yellow over time.
On the other hand, black paint is excellent for hiding imperfections as it makes everything blend in, although it can create a feeling of lower ceilings. Gray paint is a good option if you’re looking for a middle ground.
It combines the lightening effect of white with the ability to conceal details like black, striking a balance that can make the basement feel brighter while hiding imperfections.
Ultimately, the paint color for your uncovered basement ceiling should align with your desired ambiance and how you want the space to feel.
What kind of paint should I use on a basement ceiling?
For your basement ceiling, opt for 100% organic, non-toxic paint safe for kids and pets and free of volatile organic compounds (VOCs). This type of paint ensures a healthier environment and minimizes any potential respiratory issues that could arise from inhaling harmful chemicals.
Look for water-based paints labeled low-VOC or VOC-free to guarantee a clean and safe application process. These paints are eco-friendly and don’t emit strong odors, making them ideal for enclosed spaces like basements.
Additionally, choosing paint with antimicrobial properties can help prevent mold and mildew growth in damp basement areas, enhancing the longevity of your ceiling finish. Ensure any residual fumes are dissipated properly after painting and by following manufacturer instructions.
Should I paint my unfinished basement ceiling black or white?
Consider the ambiance you wish to create in your basement as you deliberate between painting the unfinished ceiling black or white.
Opting for a black ceiling can give your space an edgy, industrial feel. It creates a sense of depth, making the ceiling appear higher and adding a touch of drama to the room. The contrast between a black ceiling and light-colored walls can be striking, especially if you aim for a modern design aesthetic.
On the other hand, painting the ceiling white can make the space feel brighter, more open, and airy. White reflects light, making the basement appear larger and more inviting. It can also create a clean, minimalist backdrop for any decor style.
Can I paint the pipes mounted on the unfinished basement ceiling?
Absolutely, painting the pipes enhances the aesthetics of your basement. By adding a coat of paint, you can effectively make them blend into the surroundings, essentially becoming visually “invisible,” elevating the overall aesthetics of your basement.
However, remember that a successful paint job requires appropriate preparation. We highly recommend applying a quality primer before the actual painting. The primer will promote strong adhesion, ensuring your paint job lasts longer and appears more professional.
Do I need to prime an unfinished concrete ceiling before painting?
It’s generally recommended that unfinished concrete ceilings be primed before they are painted. Concrete is naturally porous, meaning it can absorb moisture and other substances. Primer helps seal these pores, creating a smoother and more uniform surface for the paint to adhere to.
Also, primer creates a strong bond between the concrete surface and the paint, ensuring better adhesion and durability over time. This helps prevent the paint from peeling, flaking, or chipping, especially in areas with high humidity or moisture levels, such as basements.
Priming the concrete ceiling can help reduce the number of coats of paint needed to achieve full coverage and color saturation. This can save time and money on paint costs and ensure a more professional-looking finish.
How long does it take to paint an unfinished basement ceiling?
Painting an unfinished basement ceiling requires careful planning and execution to transform the space successfully. The time to complete this project can vary depending on several factors.
Typically, it may take a few days to paint an incomplete basement ceiling from start to finish. Factors that influence the timeline include the size of the space you’re painting, the complexity of the ceiling’s layout, and the painting technique you choose.
The painting process takes 2 to 3 days for a standard-sized basement with a relatively simple ceiling layout. This time frame includes preparing the area, applying the paint coats, allowing for drying between coats, and completing the cleanup.
However, the project may take longer to complete if your basement ceiling is larger and has intricate details or you use techniques that require additional drying time. Planning accordingly and allocating ample time for each step to achieve a professional-looking finish is essential.
Unleash Your DIY Spirit: Transform Your Basement with a Splash of Paint
Painting an unfinished basement ceiling is a task that any homeowner can undertake with proper planning and execution. The process involves several crucial steps, including preparing the work area and ensuring a decluttered and clean surface for optimal paint adherence.
Equal importance should be given to protecting the floor surfaces using drop cloths and applying the paint, which needs to be thin and consistent. Moreover, attention to detail throughout is key to achieving a professional finish.
Last but not least, the choice of paint color plays a significant role. It should complement the walls and align with your personal preferences. This DIY project can transform your basement into a more appealing and comfortable space.
With just a little effort and the right tools, you can give your basement a new look that will leave you proud and accomplished. Get painting and watch your basement come to life.
Amazon and the Amazon logo are trademarks of Amazon.com, Inc, or its affiliates.

